Morphic: The Self User Interface Framework
Overview
Morphic is a user interface framework that supports composable graphical objects, along with the machinery required to display and animate these objects, handle user inputs, and manage underlying system resources such as X displays, fonts, and color maps. A primary goal of morphic is to make it easy to construct and edit interactive graphical objects, both by direct manipulation and from within programs.
A Morphic window shows just one portion of a large, two-dimensional world. The window can be panned around in this world, allowing different areas to be used for different activities. Multiple users can be active in this world simultaneously, working either in the same area (for collaborative work) or in disjoint areas (for independent work). Every user can see the screen boundaries, cursors, and actions of the other users. The sharing is implemented via the X protocol, so the other users can be physically remote as long as there is sufficient network bandwidth to support the X traffic. (Preliminary tests suggest that 30-50 KBytes/sec is required between the host machine and each remote user. The system has been tested with up to five users active simultaneously.) A given user can have several Morphic windows open, either on the same world or on different worlds, and can drag objects among these windows (assuming they all belong to the same Self Unix process).
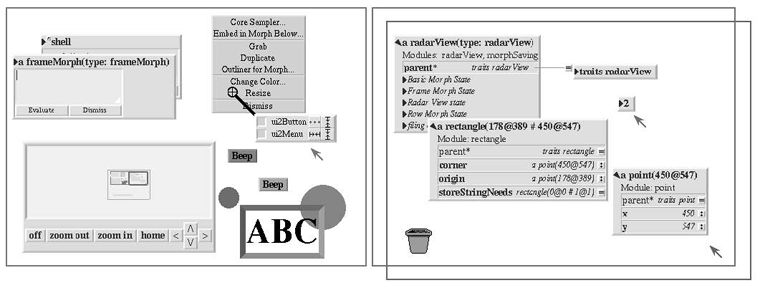
Figure 1: Three users working in the same space. Two of the other users are collaborating, so they have made their windows overlap (right). The third user is working independently in a separate area (left). The radarView in the third user’s area shows the surrounding vicinity in miniature, allowing offscreen objects and the screen boundaries of other users to be seen. The radarView is updated open enough to see where activity is occurring.
The central abstraction of morphic is the graphical object or morph (from the Greek for “shape” or “form”). A morph has a visual representation that can be picked up and moved. In addition, a morph may:
- perform actions in response to user inputs,
- perform an action when a morph is dropped onto it or when it is dropped onto another morph,
- perform an action at regular intervals, and
- control the placement and size of its submorphs.
Any morph can have component morphs (called submorphs). A morph with submorphs is called a composite morph. A composite morph is treated as a unit; moving, copying, or deleting a composite morph causes all its submorphs to be moved, copied, or deleted as well. By convention, all morphs are visible; morphic does not use invisible structural morphs for aggregation. This means that if a composite morph is disassembled, all its component morphs can be seen and manipulated.
The remainder of this document discusses the graphics interface that morphs use to draw themselves, the structure of composite morphs, how to create new kinds of morphs, and how to change a morph’s behavior with respect to user inputs, drag-and-drop, and animation.
Composite Morphs
A composite morph is a morph that contains other morphs known as submorphs. Note that the terms “composite” and “submorph” refer to roles that can be played by any morph. Submorphs can be added to any kind of morph-even morphs such as circleMorphs or labelMorphs that are atomic in some other systems. Copying, deleting, moving, drawing, and layout operations are applied to the composite morph as a whole.
The structure of a composite morph forms a tree. When morph B is a submorph of morph A, B’s owner is A and B appears in A’s submorphs list. A morph can only be a submorph of at most one morph at a time, so its owner is a single value, not a collection. A window containing a collection of morphs is itself just a morph known as a worldMorph. Each user’s cursor is represented by a handMorph. Grabbing a morph with the mouse is implemented by removing the target morph from the worldMorph and adding it to the handMorph. Dropping a morph when the mouse is released is implemented by reversing this process. A handMorph is itself a submorph of its world. The message root can be sent to a morph to get the top-most owner of a composite morph (stopping just short of the worldMorph or handMorph that contains it). If a morph is not a submorph of any morph, its owner is nil.
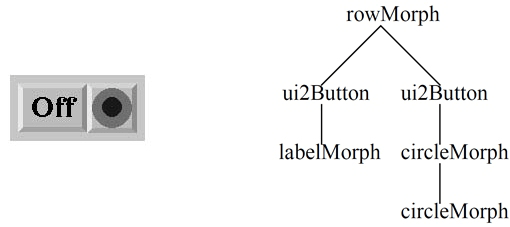
Figure 2: A composite morph consisting of a row with two buttons. Each button has submorph to indicate its function; one is a piece of text, the other is an icon consisting of two concentric circles. The diagram on the right shows its submorph structure.
A morph can be made a submorph of some other morph using the addMorph: operation. This operation updates both the owner slot of the submorph and the submorphs list of the owner to reflect the desired configuration. For example, adding morph B to morph A adds B to A submorph list, removes B from its old owner (if any), and sets B’s owner to A. The addMorph: operation also updates the layout of both B’s old and new owners. The global position of a morph is held invariant by addMorph: (although some morphs may perform an automatic layout as a side-effect of addMorph:, immediately changing the position of the newly-added morph.).
Figure 3: Using the core sampler to probe the submorphs at the point below its cross-hairs.
The programming environment includes a tool called the core sampler (available via the right-button menu of any morph) that can be used to explore the submorph structure of a composite morph. The core sampler shows the set of submorphs below a given point, the way a core sample of rock allows geologists to study the strata of rock at a given point. The core sampler allows one to use the middle button menu to operate on morphs below the surface and can be used to insert or remove morphs from a composite morph. Holding the left mouse button over the squares along the left side of the core sampler highlights the associated morph. As a shortcut, holding down the shift key while pressing the left mouse button over one of these squares will extract the associated submorph (and all its submorphs) from the composite morph. Holding the shift key while dropping a morph onto one of these squares will insert the morph as a submorph of the associated morph. The iconic buttons on the right show the current resizing attributes of the associated morph, and allow them to be changed. (Resizing attributes are discussed in section 7.)
Morph Traits and Prototypes
Morphic organizes morphs into a hierarchy much like a class hierarchy. The behavior for all “instances” of a given morph “class” is defined in a shared traits object which is a parent of all the instances. The structure of an instance is defined by the slots of its prototype. The root of the morph hierarchy is traits morph. All morphs inherit from traits morph, either directly or via one or more intermediate traits objects. (Note: to see the entire morph hierarchy, invoke the “Show Traits Family” menu command on an outliner on traits morph in the user interface. Be patient; the morph hierarchy is quite large.)
Usually, the prototype of a given morph contains all the slots of the morph from which it is derived (the “instance variable of its superclass” in a class-based system) plus, possibly, a few additions. To simplify the life of the programmer, the programming environment supports an idiom known as “copying down.” The derived prototype is described differentially. That is, it is “just like its copy-down parent except with particular slots added, deleted, or changed.” Typical class-based languages also describe the structure of subclasses differentially: a subclass may extend its superclass with additional instance variables. However, the copy-down idiom also allows the derived prototype to selectively omit slots of its copy-down parent or change their contents. For example, the circleMorph prototype is derived from the morph prototype, but it replaces the “rawBox” slot of the morph prototype with the slots “radius” and “center”. This would not be possible in most class-based languages.
Note that the class-like organization of the morph hierarchy—with its parallel traits and prototype hierarchies and its use of the copy-down mechanism to propagate slot information down the prototype hierarchy—is only one way that Self programs can be organized. Other parts of the system, such as the world-wide-web browser, are organized differently.
Implementing a New Kind of Morph
It is easy to make a new kind of morph. One typically starts with a copy of some existing morph and adds or overrides state and behavior to create the new morph. Often, the most appropriate starting point is a copy of morph, the root of the morph object hierarchy. Morph has default behavior for everything from drawing to handling user inputs; one thus starts with a working morph and modifies its behavior incrementally to create the new type of morph.
The programming aspect of creating a new morph is straightforward. However, four other things must be done to make the new morph into a first-class citizen. First, its behavior should be factored into a shared parent (called a traits object) to allow the behavior of all instances to be changed by changing the shared parent. Second, the shared traits object and a prototypical instance of the new morph should be embedded in the global namespace. Third, the copy-down parent of the prototype should be set so that changes to the structure of the parent are propagated correctly. Finally, the new prototype and traits objects should be assigned to a module to allow the code for the new morph to be saved in a file.
Of course, if one just wants to do a quick experiment, none of these housekeeping chores are necessary. However, sometimes one decides to make an experimental morph into a first-class morph (the bottom-up approach). In other cases, one sets out from the beginning to create a new first-class morph (the top-down approach). The next two sections will describe how to create a new kind of first-class morph using each of these approaches.
Morph Creation: The Bottom-up Approach
In the bottom-up approach, one is initially interested in getting a morph with the desired behavior as quickly as possible. Thus, an appropriate morph is copied and modified by adding slots directly to the morph itself. Suppose one wished to create a morph that displayed as an oval and that toggled between two colors when the middle mouse button was pressed. To get a morph to modify, evaluate:
morph copy
This will make an outliner on a new morph. Use the “Show Morph” command on this outliner’s middle-button menu to make the graphic representation of the copy appear.
The “Add Slot” command on the outliner’s middle-button menu can be used to add a data slot to hold the alternate color. Enter the following expression and accept it by clicking on the green (top) button:
otherColor <- paint named: 'leaf'
The morph’s drawing behavior can be customized by adding the method:
baseDrawOn: aCanvas = (
        aCanvas fillArcWithin: baseBounds
                From: 0
                Spanning: 360
                Color: color.
        self)
Morphic optimizes shadow drawing for rectangular morphs such as prototypical morph, which draws as simple rectangle. However, this morph is not rectangular. To make its shadow reflect its true shape, the isRectangular behavior must be overridden by adding the constant slot:
isRectangular = false
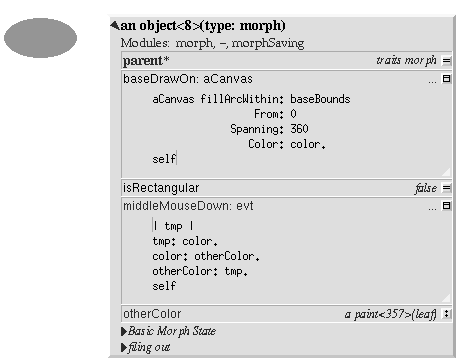
Figure 4: A new kind of morph has been created by modifying a copy of the standard morph. The slots baseDrawOn:, isRectangular, middleMouseDown:, and otherColor have been added to the morph to obtain the new behavior. The morph itself appears on the left; an outliner showing its slots appears on the right.
The new morph’s input behavior can be customized by adding the method:
middleMouseDown: evt = (| tmp |
        tmp: color.
        color: otherColor.
        otherColor: tmp).
The morph now draws itself as a filled oval. Clicking the middle mouse button on it causes its color to toggle between its original color and leaf-green. This new morph can used as a prototype; any copies will get the state and behavior of the prototype at the time of copying. However, later changes to the prototype will not be reflected in the copies. For example, even if the prototype’s middle-mouse behavior were changed to cycle through three colors, copies made before this change would still only toggle between two colors.
To allow the behavior of all copies to be changed at once, one can move shared behavior and state into a shared traits object. Self’s object literal syntax can be used to create a new object to be used as the shared traits. As a shortcut, rather than creating an empty traits object and then adding a parent slot to it, an object containing an initialized parent slot can be created in a single operation. Evaluate the expression in an evaluator on the outliner (use the middle-button menu command “Evaluator” to open an evaluator on the outliner if necessary):
(| parent* = traits morph |)
This creates a new object whose parent is traits morph. To make the new morph inherit through the new traits object, invoke the “Grab pointer” command by pressing the middle-button menu on the button on the right side of the parent slot of the morph. Drop the end of the pointer onto the new traits object to make the parent slot of the morph point to the new morph. This technique is called “arrow-dragging”.
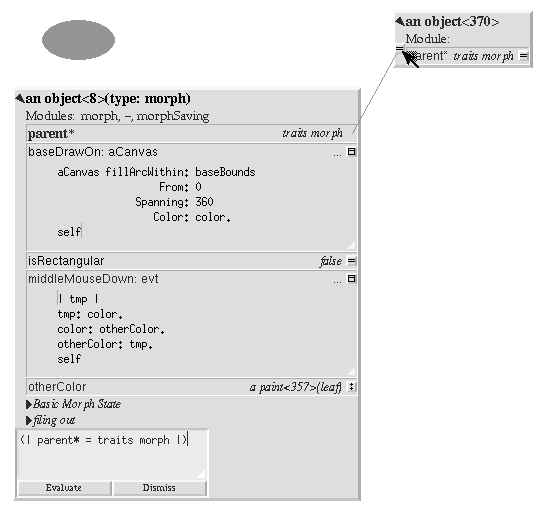
Figure 5: A new traits object has been created to hold behavior to be shared by all instances of the morph. Arrow dragging is being used to make the parent slot of the new morph point to the new traits object.
Now, the behavior to be shared can be moved from the prototype into the new traits object. Invoke the “Move” command on the middle-button menu for the isRectangular slot. This causes the slot to be plucked out of the object. Drop the slot onto the shared traits object. This causes it to be added to the that object. Repeat this process for the baseDrawOn: and middleMouseDown: slots.
The Self language uses slot inheritance to share both data (isRectangular) and behavior (baseDrawOn: and middleMouseDown:). The programming environment supports a similar kind of uniformity by allowing any slot to be moved or copied by via drag-and-drop. A entire category can also be copied or moved by dragging.
Note that when moving a slot between an object and its parent there is an interval during which the slot is not in either object. If a message matching the slot name is sent to the object during this interval, the object’s response is be determined by a slot inherited from a parent higher in the inheritance chain, if any. If it is important to avoid this transient state, one can move the each slot by first copying it from the prototype into the parent and then remove it from the prototype. A slot is removed simply by moving it and dropping it onto the trash can morph (or by dropping it on the background and then dismissing it).
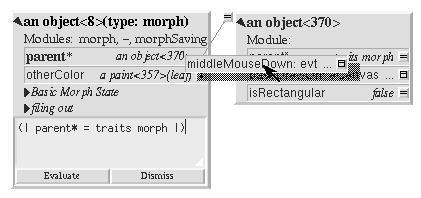
Figure 6: Using slot-dragging to move a slot into the new traits object. Using direct manipulation to move and copy slots makes programming feel like manipulating concrete objects. This narrows the gap between composition of graphical objects (building and modifying composite morphs) and programming.
Now, changing the traits object changes the behavior of all instances. For example, the draw method in the traits can be changed to draw an unfilled oval. To demonstrate the power of shared behavior, first make several copies of the protypical oval using the “Duplicate” command on its right-mouse menu. Then modify the baseDrawOn: method in the shared traits as follows (note the change from “fillArcWithin:” to just “arcWithin:”):
baseDrawOn: aCanvas = (
        aCanvas arcWithin: (baseBounds indent: 3)
                From: 0
                Spanning: 360
                Width: 3
                Color: color.
        self)
The oval is drawn with a pen three-pixels wide. To accommodate the extra width, the rectangle passed to the canvas is indented by three pixels. Note: A morph should never draw outside its baseBounds. When this method is accepted, all copies of the prototype reflect the change. However, Morphic doesn’t automatically redraw instances when the draw method is changed. To see the change, drag some large object over the ovals to make them redraw.
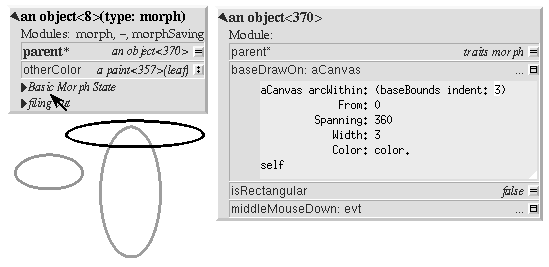
Figure 7: Changing the shared traits object changes the behavior of copies of the prototype (instances). In this case, the draw method has been changed to draw unfilled ovals.
At this point, the prototype for a new kind of morph has been created and the behavior common to all its instances has been factored into a separate traits object to facilitate later changes. The next step is to install the prototype and its traits in the global and traits namespace objects. Doing this allows the morph prototype and its traits to be referred to by name.
First, summon outliners for the globals and traits namespace objects by evaluating the expressions “globals” and “traits” in any text editor. (That is, type the expression, select it, and invoke the “Get Expression” command in the middle-button menu of the editor.) Then, open an appropriate category for the new morph or create a new category. Within the chosen category of “globals,” create a slot to hold the new morph’s prototype by invoking the “Add Slot” command and accepting the following expression:
ovalMorph = nil
Next, invoke the “Grab pointer” command by pressing the middle-button menu on the button on the right side of the new ovalMorph slot. Drop the end of the pointer over the new morph prototype and release the mouse. This makes the new slot point to the new morph prototype. Repeat the procedure just described to create an “ovalMorph” slot in the traits namespace and point it to the traits object for the new morph.
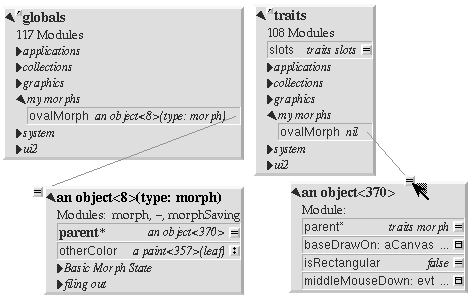
Figure 8: Installing the new morph prototype and traits object in the globals and traits namespace objects. In each case, a new constant slot is created in the appropriate category, then arrow-dragging is used to make the new slot point to the desired object.
Finally, invoke the “Make creator” middle-button menu command on each new “ovalMorph” slot to designate it as that morph’s creator. This informs the system that the given slot is the given object’s home in the global namespace. (An object may be reachable via several global slots; setting its creator path distinguishes one of these slots as the object’s official “home address.” This information is used to determine the object’s name, as well as which the module in which to record information about the object as a whole, such as the object comment.) In a few seconds (if outliner updating is on), the outliner titles of the ovalMorph prototype and its traits object will be updated to show the new names for these objects.
To allow a composite morph containing ovalMorphs to be saved in a file, the prototype method in the prototype (not the traits!) must return the prototype ovalMorph. The ovalMorph prototype already has a prototype method that was copied from the original morph prototype. Change the body of the prototype method in the “filing out” category to:
ovalMorph
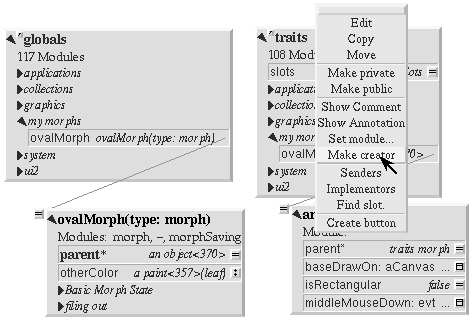
Figure 9: Setting the creator slot of the new traits object. The system uses this information to name objects, among other things. Note that the title of the prototype (on the left) has already been updated to reflect its new name.
Many Smalltalk programming environments allow an instance variable to be added to a class at runtime. The new instance variable is propagated down to all subclasses and added to all existing instances of the class and its subclasses with an initial value of nil. The Morphic programming environment can provide a similar service for the copied-down slots of prototypes, with two significant differences: (1) changes to the values of a copied down slots are propagated, as well as slot additions and removals and (2) changes are propagated only to objects registered in the global namespace (other prototypes), not to clones of those objects (instances).
The system can be told to maintain the copied-down slots of the ovalMorph prototype automatically by setting its copy-down parent (Figure 10). Select the “Show Annotation” command in the middle-button menu on the title of the ovalMorph’s outliner. Set the copy-down parent field to “morph”, the copy-down selector to “copyRemoveAllMorphs”, and press the green (top) button to accept this change. (The copy-down selector is sent to the copy-down parent to create a fresh copy from which to copy slots.) The system will ask if the slots “parent” and “prototype” should be omitted from the copy-down operation, since their contents differ from that of that of the copy-down parent. They should be.
Finally, it would be nice to be able to save the prototype and traits for the new ovalMorph in a file so that it can be archived or read into another Self world. Several steps are required. First, the module itself must be created. The system will create a new module (after getting confirmation from the user) the first time its name is used. Then, the slots in the globals and traits namespace object must be assigned to the new module. Finally, the non-copied-down slots in the prototype and traits objects are assigned to the module. This may sound tedious, but the system provide several shortcuts to accelerate the process.
To set the module for the new morphs home slot, invoke “Show annotation” on the ovalMorph slot in the globals object, type “ovalMorph” in the module field, and accept the change (Figure 11). Since this is a new module, the system will ask whether a new module should be created (yes), whether it should be a submodule of an existing module (no), and what subdirectory it should be stored into (“applications”). Set the module of the ovalMorph slot in the traits object the same way.
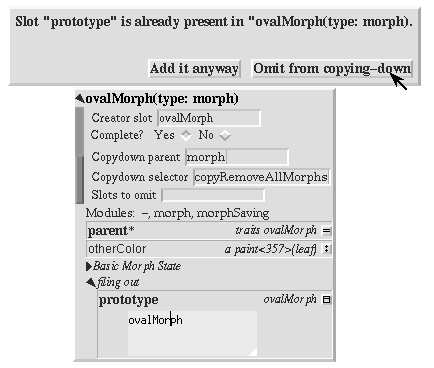
Figure 10: Setting the copydown parent for the new prototype.
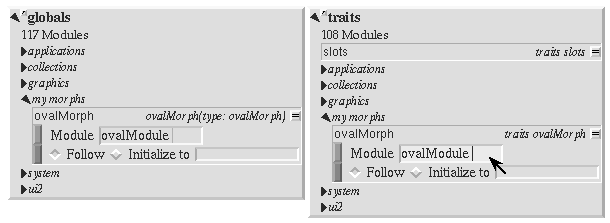
Figure 11: Setting the modules for the namespace slots. The module will be created if it doesn’t already exist; the system asks the user several questions about where the new module should live and whether it is a submodule of some existing module.
All the slots in an object (or within one category of that object) can be assigned to a module in a single operation. To assign the slots of the new traits object to the new module, invoke the “Set module...” command on the header of its outliner. The system will ask which slots should be assigned to the module (all) and which module to put them into (ovalModule). After a few seconds, the module summary at the top of the outliner should update to indicate that all slots of the traits object are in ovalModule. Repeat this procedure to assign all the slots of the ovalMorph prototype to ovalModule.
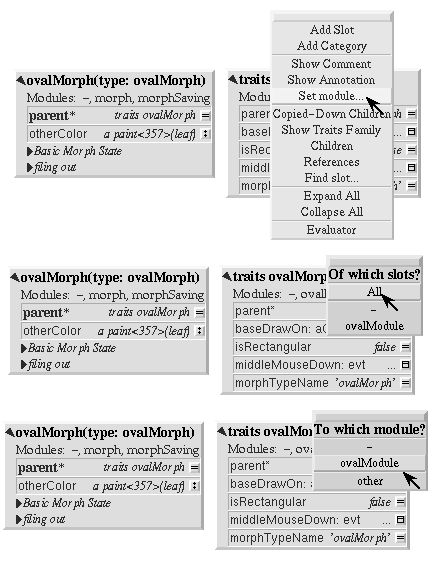
Figure 12: Assigning all the slots of the new traits object to the new module.
Now that all the slots of the new morph and its prototype have been assigned to the new module, the module can be filed out. Invoke the “Changed modules...” command on the background menu to get the changed modules morph. Then press the little button marked “w” to the right of “ovalModule”. The system will save the code for the module in a file named “ovalModule” in the “applications” subdirectory of the current working directory. (If this directory doesn’t exist, the system will complain. Create the directory and try the fileout operation again.) The oval morphs module can later be loaded into a snapshot by evaluating the expression:
bootstrap read: 'ovalModule' From: 'applications'
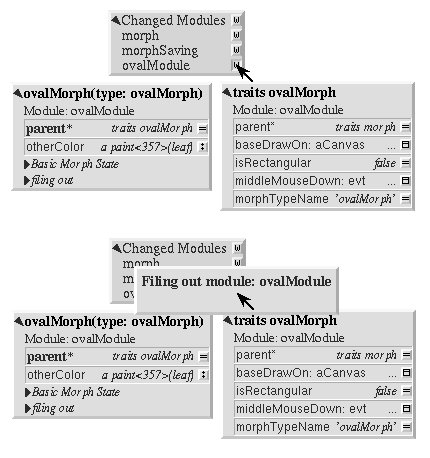
Figure 13: Saving the code for the new morph in a module file.
Morph Creation: The Top-down Approach
The top down approach to creating a new morph is similar to the approach just described, except that one plans to make a first-class citizen from the beginning. Thus, the order of steps is slightly different. Here is a brief outline of the procedure:
Add a slot to the traits namespace object (using “Add Slot”):
ovalMorph = (| parent* = traits morph |)
Add a slot to the globals namespace object:
ovalMorph = (| parent* = traits ovalMorph |)
Make each new slot be the creator of its contents (using “Make creator”).
Set the copy-down parent of the prototype to morph (via “Show annotation” on its outliner).
Set the module of the two namespace slots to ovalModule (creating the new module in the process).
Assign all slots of the new traits and prototype objects to ovalModule.
Start programming the new behavior.
This procedure does all the housekeeping chores up front, so the module can be filed out at any time. As the programmer works, the system will deduce that any slots added to ovalMorph’s traits or prototype should be placed in the same module as the other slots in that object (ovalModule). In a future release of the system, the initial housekeeping may be automated. This would make creating a new kind of morph a one-step operation.
Saving a Composite Morph
The system includes an experimental facility for store the structure of a composite morph to a file. This allows a morph constructed by direct manipulation to be saved into a file that can be read later to reconstruct the morph. This is how the “factory” was created. The morph saving facility requires that every morph and submorph to be saved supply implementations of the messages slotsToNotFileOut, appendOtherSlotsOnto:, storeStringNeeds, and prototype. Unfortunately, because morph saving was added later as an experiment, not all morphs have been retro-fitted with implementations of these messages. The enterprising user could easily infer how to add the required support to morphs that do not yet have it.
Suppose one has created a column of useful buttons that one wishes to save. (Fortunately, buttons, columns, rows, frames, and labels are among the morphs that do support saving.) To save this morph, create an outliner for it and then evaluate in that outliner:
saveMorphInFile
The system will prompt for a file name and will give graphical feedback as each component morph is stored. The file can later be read by evaluating:
worldMorph loadMorphFromFile
Again, the system will prompt for the file name. A copy of the morph that was saved will be added to the hand. The return value of the expression will also be added to the hand, which may temporarily hide the new morph. Click any mouse button to put down the two objects, then move the top one out of the way.
Handling User Input
Handling Events
Morphic represents user actions such as pressing a key or mouse button using ui2Event objects. A ui2Event actually carries two kinds of information: its type, such as “leftMouseDown”, and the state of the mouse buttons and certain keyboard keys when the event occurred. This allows a program to tell, for example, if the shift key was held down when the left mouse button was pressed. As events occur, they are placed into a buffer. Morphic removes and processes events from this buffer in order. Thus, even if a user occasionally gets ahead of the system, the system will eventually catch up.
A morph can handle a given kind of event simply by implementing one of the following messages:
keyDown: evt
keyUp: evt
mouseMove: evt
leftMouseDown: evt
leftDoubleClick: evt
leftMouseUp: evt
middleMouseDown: evt
middleDoubleClick: evt
middleMouseUp: evt
rightMouseDown: evt
rightDoubleClick: evt
rightMouseUp: evt
The event is always supplied so that its state can be examined. The default behavior of the leftMouseDown: message is to pick up the composite morph containing the morph that gets the event. (That is, the left mouse button generally means “move”.) The default behavior of the rightMouseDown: message is to pop up the morph menu (the “blue” menu). The default behavior of the other messages is to return the special dropThroughMarker object, indicating that the event is not processed by this morph.
Submorphs of a morph are displayed in front of their owning morph. By default, submorphs are usually given the first opportunity to handle incoming events. If a submorph does not handle an event, it returns the dropThroughMarker object, and Morphic gives the submorph behind it a chance to handle the event. Each user generates events at the current location of their cursor. One can visualize an event as “falling down through” the submorphs of the composite morph at that location until either the event lands on a submorph that handles it or until all the submorphs of the composite at that point are exhausted. However, events do not fall between top-level morphs. For example, if an outliner is covered by a morph that does not handle middleMouseDown events, one cannot invoke the middle button menu of the outliner through the intervening morph.
In some cases, a morph may wish to handle certain events before its submorphs. For example, a ui2Menu morph handles leftMouseDown events itself rather than letting its component buttons get them in order to highlight the button under the cursor and to pop down the menu when a selection is made. A morph can arrange to handle certain kinds of events before its submorphs by overriding the allowSubmorphsToGetEvent: message.
There are actually two classes of events. KeyDown events, the three mouseDown events, and the three doubleClick events are dispatched using the “falling through the submorphs” technique just described. The other events—keyUp, mouseMove, and the three mouseUp events are dispatched only to interested subscribers. The rationale is that some morphs are interested in discrete events, such as mouseDown transitions, while others need to track the mouse or keyboard over an extended period of time. Dispatching high-frequency events such as mouseMove to uninterested morphs would be inefficient. Futhermore, some morphs need to get events even when the cursor is no longer over the morph. For example, a click-to-type editor should continue to get keyDown events until another editor is clicked. In short, Morphic supports both spatial and subscription-based event dispatching because both are useful.
The events generated by a particular user are dispatched from the handMorph associated with that user. Each hand-Morph keeps a list of subscribers interested in various kinds of events. A morph asks the appropriate handMorph to start or stop its subscription to a particular kind of event. Every event has a reference to the hand that generated that even. Thus, a morph that wishes to track the mouse until the button is released (e.g., sliderMorph) would do the following:
- on leftMouseDown, execute “evt sourceHand subscribeUntilAllUp: self”
- on mouseMove, update the slider position from the current mouse position (which is in global coordinates)
Mapping special characters to actions
When a morph receives the keyDown: message, the next step is the interpretation of any control-, meta- or command- keystrokes. For example, on the Macintosh, a command-X should perform a cut operation. A morph wishing to respect these conventions should do two things: it should inherit from traits ui2Event ignoreSpecialCharactersMixin, and it should, upon receiving the keyDown: message, send sendMessageToHandleKeyboardEventTo: the event, passing itself as the argument. The latter message tells the event to decode any special characters and send an apprpropriate message back to its argument. The mixin provides default behavior.
Drag and Drop
A morph can perform some action when another morph is dropped onto it and can decide which dropped morphs it will accept. In addition, the dropped morph can perform some action in response to being dropped.
To accept dropped morphs, a morph must respond affirmatively to the message:
wantsMorph: m Event: evt
The morph to be dropped is supplied as an argument to allow the receiving morph to decide if it wishes to accept the drop. For example, a printer icon morph might accept only document morphs. If the target morph agrees to accept the dropped morph, the target is then sent the message:
addDroppingMorph: m Event: evt
to actually perform the drop action. Part of this action should be to put the dropping morph somewhere or delete it. For example, the printer icon morph might queue a print request, then add the document morph to a folder morph representing the printed documents.
Finally, the dropped morph is informed of the drop (post facto) by sending it the message:
justDroppedInto: m Event: evt
The event is provided in these messages to allow the morph to examine the state of the mouse buttons or modifier keys at the time of the drop.
Automatic Layout
Packing
Automatic layout relieves the programmer from much of the burden of laying out the components of a composite morph such as a dialog box. By allowing morphic to handle the details of placing and resizing the components, the programmer can focus on the topology of the layout, without worrying about the exact positions and sizes. Automatic layout also allows composite morphs to adapt gracefully to size changes, including font size changes.
Layout morphs manage the placement and sizing of their submorphs. Layout morphs currently include rowMorphs, columnMorphs, frameMorphs and their descendents. All other morphs leave the size and placement of their submorphs alone. The current set of layout morphs all use the same layout strategy: linear, non-overlapping packing. Rows pack horizontally from left-to-right. Columns, frames, and their descendents pack vertically from top-to-bottom. This simple approach, while it does not handle every conceivable layout problem (e.g., tables whose rows and columns adjust to the size of their contents), is surprisingly powerful. All automatic layout in morphic is based on nested combinations of rows and columns.
Linear packing is best explained procedurally. Consider a rowMorph. Its task is to arrange its submorphs into a row such that the left edge of each morph just touches the right edge of the next morph. The submorphs are processed in order; that is, the first submorph will be placed at the left end of the row, then the next submorph will be placed to the right of the first, and so on. The last submorph will be placed at right-most end of the row. Notice that the order of the submorphs is not affected by the packing process. Also notice that the packing is done only in one primary dimension—the horizontal dimension in this case. The other dimension is also considered during packing, and is controlled by the justification parameter of the row. Depending on this parameter, the tops, bottoms, or centers of the submorphs can be aligned with the top, bottom, or center of the row.
Space-filling
For simplicity, the packing strategy was described as if the submorphs to be packed were all rigid. In order to support “stretchy” layouts, morphs can be designated as space-filling. (Note: The source code uses the older term, flexible.) When there is extra space, a space-filling morph expands to fill this space. If there is no extra space, a space-filling morph shrinks to its minimum size. When there are several space-filling morphs in a single row or column, any extra space is divided evenly among them.
Space-filling morphs can be used to control the placement of submorphs within the primary dimension when a row or column is stretched. For example, suppose one wanted a row with three buttons, one at the left end, one at the right end, and one in the middle. This can be accomplished by inserting space-filling morphs between the buttons:
<button1><spacer><button2><spacer><button3>
When the row is stretched, the extra space is divided evenly between the two spacers, button2 stays in the center, and button3 stays at the far right. By making the color of the spacers match that of the underlying row, they become effectively invisible. This is a common technique.

Figure 14: Using flexible spacer morphs to space buttons evenly within a row. Normally these spacers would be made the same color as the row, making them effectively invisible
Shrink-Wrapping
It is sometimes desirable for the size of a morph to depend on the sizes of its submorphs. For example, the size of a button should depend on the size of its label. (It would be annoying if it didn’t; the programmer would have to manually resize the button after changing the label.) A morph designated as shrink-wrap shrinks (or grows) to the smallest size that accommodates the size requirements of its submorphs.
Minimum Sizes
Morphs have a minimum size in each dimension (minWidth and minHeight). These sizes determine the minimum amount of space that will be allocated to a morph during layout. The minimum size of a morph takes into account the minimum sizes of its submorphs. For example, the minimum width of a row is the sum of the minimum widths of its submorphs (plus a little bit for a border, if it has one).
The absolute minimum width and height of a morph, even when it has no submorphs, is specified by its baseMinWidth and baseMinHeight. For some kinds of morph, these values are stored in assignable slots in the morph. For others, these values are defined by inherited constant slots to save space. One can use these attributes to give a space-filling morph a minimum size.
Resize Attribute Summary
The resizing behavior of a morph in one dimension is completely independent of its behavior in the other dimension; that is, a morph actually has two independent resizing attributes, one for the horizontal dimension and one for the vertical dimension.
To summarize, the resizing behavior of a morph along a given dimension is controlled by its resizing attribute, which has one of three values:
rigid The morph is not resized.
space-filling In a row or column, the size of the morph adapts to fill the available space. Extra space is shared evenly with any other space-filling morphs in that row or column.
shrink-wrap The morph is shrunk to just fit around its submorphs, or to its minimum size, whichever is smaller. Enclosed space-filling morphs are shrunk if necessary.
A morph’s minimum size in a given dimension determines the smallest amount of space that should be allocated to it during layout. The core sampler and/or properties sheet can be used to change these attributes.
Animation
Animation can be used to make an interactive application seem more alive and can convey valuable information. However, animation can become annoying if the user has to wait until the animation completes before doing anything else. In Morphic, animation and user actions are concurrent, and multiple animations can be active while multiple users interact with the system.
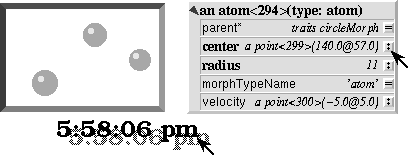
Figure 15: Three simultaneously active morphs: an ideal gas simulation, a digital clock, and an outliner on the Self object underlying one of the atoms in the simulation. The clock updates every second, the simulation runs continuously, and the outliner periodically updates its center and velocity slot values as the underlying atom moves. A morph continues to operate while it is being moved (the clock is being moved here) or while an external animation is applied to it. Note that multiple users can be active simultaneously; this example shows the cursors of two users.
There are two ways to achieve animation. First, a morph can have lightweight autonomous behavior which typically, although not necessarily, appears as animation. For example, a clock might advance the time or a discrete simulation might compute simulation steps. Second, Morphic includes a kit of external animation behaviors that can be applied to any morph, including motion, scaling, and color change animations.
Although autonomous behavior and external animations are implemented using the same underlying mechanism, they have different purposes and are specified in different ways. The autonomous behavior of a morph is an intrinsic property of that morph. For example, updating the time is central to being a clock morph. Autonomous behavior is defined in the morph itself. External animation behaviors, on the other hand, are typically transient and imposed from outside. For example, the Self programming environment gives feedback for certain actions by “wiggling” the relevant morph. An external animation is specified by creating a separate animation activity object and applying it to the morph to be animated. Animation is orthogonal to autonomous behavior; for example, a clock morph would continue to run even while a motion animation whisked it across the screen.
Stepping
The autonomous behavior of a morph is defined by its step method. For example, to make a simple digital clock, one could add the following slot to a copy of labelMorph:
step = ( label: time current timeString )
The clock is activated by asking the system to send the “step” message to it either continuously (every display update cycle) or at periodic intervals (e.g., once per second). Make sure the labelMorph is visible in the world (use the “Show Morph” menu command if necessary), then, in an evaluator on its outliner, evaluate:
getSteppedEveryMSecs: 1000
This will cause the step message to be sent to the morph once per second (i.e., every 1000 milliseconds), causing it to display a formatted string representing the current time. Step messages are sent synchronously during the display update cycle. This has the advantage of simplifying synchronization but requires that step methods complete quickly to avoid delaying user interactions.
The message stopGettingStepped can be sent to the morph to turn off stepping for that morph. Morphic automatically stops stepping when the target morph is removed from the world. To make the clock morph reactivate itself when dropped back into the world, add the following slot:
justDroppedInto: m Event: evt = (
        isInWorld ifTrue: [ getSteppedEveryMSecs: 1000 ]).
External Animation
External animation of a morph is achieved by scheduling an animation activity with that morph as its target. An animation activity changes some property of its target gradually over the course of a number of display cycles (frames). For example, a positionAnimator animates a change in its target morph’s location. The programmer specifies the initial and final values of the property to be changed (e.g., the starting and ending position) and the duration over which the change should occur. The duration can be defined in two ways. Frame-based animation lets the programmer control animation smoothness by specifying that the animation should take a given number of frames regardless of the time per frame. Time-based animation lets the programmer specify the desired amount of time the animation should take, but the number of intermediate frames depends on the time per frame, which may vary with system load, scene complexity, and other factors. Animations can be paced linearly or slow-in-slow-out. A slow-in-slow-out animation starts slowly, builds to a maximum pace, then decelerates. There are activities that animate the position, size, and color of morphs, activities that send arbitrary messages, and compound activities that combine a set of other activities either sequentially or concurrently. In fact, this activity architecture is the basis of all animation in Morphic: an activity called a periodicStepActivity is used to implement the stepping facility.
Other Issues
Local versus Global Coordinates
The position of a morph is defined relative to the position of its owner. This makes it unnecessary to update the positions of all the submorphs when moving a composite morph. However, it also means that morphs with different owners have positions in different coordinate systems. In order to compare the positions of morphs having different owners, it is necessary to use their positions in the world’s coordinate system, which are computed by sending the globalPosition message to each morph.
Synchronization
Animation, stepping, and other activities are handled synchronously, as part of the basic user interface loop. Thus, a sequence of actions done by an activity or a step method appear to happen atomically; the user never sees the morph in an intermediate state in which some but not all of the actions have taken place. For example, if a morph is removed from one morph and added to another, the user never sees the transient state in which the morph is not in the world at all. Likewise, any layout modifications resulting from user actions—such as adding a new morph to a row—appear to happen atomically; one never sees a partially complete layout.
Often, however, an independent Self thread wishes to manipulate morphs in the user interface. In order to make such actions appear atomic, they should be done under the protection of the UI synchronization semaphore. The preferred way to do this is to wrap the action or actions in a block to be executed between display cycles of the morph’s world:
aMorph safelyDo: [ ... ]
Synchronization errors usually appear as intermittent graphical glitches, although in rare cases the submorph structure may be corrupted (e.g., a morph appearing in the submorph lists of multiple morphs).
Display Updating
Morphic uses a double-buffered, incremental algorithm to keep the screen updated. This algorithm is efficient (it tries to do as little work as possible to update the screen after a change) and high-quality (the user does not see the screen being repainted). It is also mostly automatic; many applications can be built without the programmer ever being aware of how the display is maintained. The description here is mostly for the benefit of those curious about how the system works.
Each morphic screen window displays the contents of some worldMorph. A worldMorph keeps a list of rectangular “damaged” regions of the screen. Every morph can compute a rectangle that encloses its entire visible representation. When a morph changes its appearance (for example, its color), it sends itself the message changed. This causes its bounding rectangle to be translated into global coordinates and added to the damage list of the worldMorph that contains it. (This worldMorph is found by starting at the morph and following the owner chain; the worldMorph is the last morph in this chain.) On the next display update cycle, the worldMorph redraws the portions of all morphs that intersect rectangles in the damage list (via an off-screen buffer), including the morph that was changed. The world-Morph then clears its damage list to prepare for future damage reports.
When a morph changes size or position, damage is reported both before and after the change. This causes the screen to be updated at both the old and new size or position.
Typically, the implementor of a morph writes code to send the changed message automatically after updating any slot that affects the morph’s appearance. For example, the color: message defined in traits morph sends changed automatically. Likewise, external animation activities report appropriate changes. Thus, the client of a morph usually need not send changed explicitly.
Layout Updating
Morphic also maintains morph layout incrementally. When a morph is changed in a way that could influence layout (e.g., when a new submorph is added to it), the message layoutChanged is sent to the morph. This triggers a chain of activity. First, the layout of the changed morph is updated. This may change the amount of space apportioned to some of its submorphs, causing their layouts to be updated. Then, if the space requirements of the changed morph have changed (e.g., if it needs more space to accommodate the newly added submorph), the layout of its owner is updated, and possibly its owner’s owner, and so on. In some cases, the layout of every submorph in a deeply-nested composite morph may need to be updated. Fortunately, there are many cases where the layout updates can be localized. Morphic detects these cases, thus saving a great deal of unnecessary work.
As with changed messages, morph clients usually need not send layoutChanged explicitly since the most common operations that affect the layout of a morph—such as adding and removing submorphs or changing its size—take care of this already.
Normally, layout is performed incrementally after every morph add or remove operation. However, when a large composite morph is to be constructed, the cost of the repeated layout operations can be significant. The programmer can ameliorate this problem by using the batch operation addAllMorphs: rather than a sequence of individual addMorph: operations.
If a morph is not in a worldMorph, however, all layout is deferred. This is done partly to optimize creating large composite morphs (which are often constructed “off-line” and then added to the world) and partly because the exact size of labelMorphs depends on font metrics that may vary from one X server to another. Thus, the layout of a morph containing labels would have to be recomputed in the context of a particular world anyway. Occasionally, one needs to know the exact size of a newly created morph (for example, to ensure that a menu does not pop up partially off the edge of the screen). In such cases it may be necessary to temporarily add the morph to the world in some remote location (such as -1000000 @ -1000000) to force it to be laid out.
Morph Copying
When a composite morph is copied, its entire submorph tree is traversed and copied to produce a duplicate with the same structure. However, simply copying the structure is not quite enough because some of the morphs within a composite morph may refer to other morphs within the composite. For example, the buttons of a radarView refer to the radarDisplay morph. When a radarView morph is copied, the buttons of the copy must be updated to point to the radarDisplay morph in the copy, not that in the original radarView. A simplified diagram of this process is shown in Figure 16.
Sometimes a morph may need to do something special when it is copied. In this case, the message baseCopy should be overridden rather than copy. See traits ui2Button for an example of how this is done.
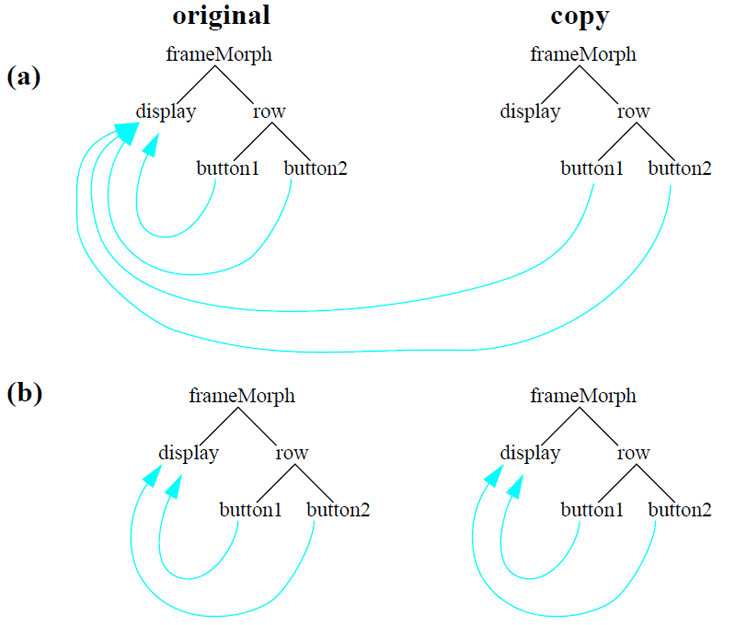
Figure 16: Copying a composite morph. First, the submorph structure of the original morph is copied (a). Then, references among the submorphs of the composite updated to mirror those of the original (b).
Morph Responsibilities
There are two messages that each type of morph is expected to implement: morphTypeName and prototype. The first returns a string used to show the type of a morph in the user interface (e.g., in the core sampler) while the second, which should return the prototype for the morph, is used by the morph filing out code.
Two other messages may need to be overridden. These are:
isRectangular This message is used to optimize the drawing of shadows for morphs whose display completely fills their bounding rectangle. The default implementation returns true, so non-rectangular morphs such as circleMorphs must provide an implementation that returns false. (Hint: If a non-rectangular morph casts a rectangular shadow, someone probably forgot to override this message.)
mapReferencesUsing: This message is sent during copying to update any references between the submorphs of a composite morph. Its argument is a dictionary mapping submorphs in the old composite morph to the corresponding submorphs in the copy. Morphs whose slots may contain references to other morphs within a composite should override this message to update these slots during copying. For example, a ui2ButtonMorph overrides this message in order to update its “target” slot. That way, if the button and its target are both embedded in some composite morph that is copied, the button in the copy will refer to the target in the copy. See traits colorChangerMorph for an example.
Some Useful Morphs
The Self system comes with a large library of morphs. While some morphs exist solely to supporting the programming environment, many are general-purpose and can be reused to construct new applications. This section mentions some of the most useful and reusable morphs. To find out more about a given morph, use the programming environment to examine its prototype and traits objects. Useful comments are sometimes buried in the bodies of methods.
Widget morphs are interactive, allowing the user to invoke an action or input some data.
sliderMorph Allows the user to specify a numerical value in some range. When the slider is manipulated, its target object is sent a user-specified message with the new slider value as an argument.
ui2Button Executes a user-specified script when the button is pressed. The script can refer to the button’s target. The target of a button or slider morph can be set by using the middle-mouse menu “Set Target” command. This sets the target slot of the button or slider to the morph directly below it. Buttons are often decorated with a textual label, but a button can contain arbitrary morphs instead of, or in addition to, this label.
ui2Menu A column full of buttons. A menu can be “pinned down” using the unlabeled button at its top. It can then be manipulated or disassembled like any other morph. Menus support a rich set of messages for adding normal or grayed out buttons and for inserting dividing lines.
Structural morphs are typically used to bind morphs together and arrange them into a pleasing layout.
rowMorph and columnMorph Pack their submorphs into a row or column. These morphs offer several justification options and can also provide a border of empty space around their contents.
frameMorph Like a columnMorph, except that it can display various kinds of borders around its contents. Bezeled frameMorphs are used heavily in the programming environment to provide a three-dimensional look.
spacerMorph While many types of morph (such as an empty rowMorph) could be used to fill a space between morphs, it is preferable to use a spacerMorph to make it clear that the only purpose of the morph is to control spacing. (Morphic allows users to customize the user interface by directly manipulating morphs. Thus, just as is it important to write readable programs, it is important to build composite morphs with “readable structure.”) Often, a spacerMorph is used to provide a fixed amount of space between submorphs in a rowMorph (or columnMorph). To accomplish this, the spacerMorph should be of the desired width, be rigid horizontally and space-filling vertically, and be the same color as the rowMorph. The message copyH:Color: (or copyV:Color: to creating a vertical spacer for use in a column) can be sent to spacerMorph to create a new spacerMorph with these properties. The other common use of spacerMorphs is to provide a stretchy space between morphs; the expression “spacerMorph copy beFlexible” makes a spacerMorph that does the job. Setting the baseMinWidth: or baseMinHeight: of such a spacer ensures that at least the given amount of space will be provided.
Other morphs supply decorative or information content for user interfaces.
labelMorph displays a single-line string in a single font style, size, and color.
circleMorph displays a filled circle.
pixmapMorph displays an image (currently, at most 8 bits deep).
movieMorph cycles through a sequence of images as it is stepped.
The library includes two kinds of text editors.
editorMorph a general editor that allows arbitrary morphs to be embedding in the text.
uglyTextEditor a simple, text-only editor that is a bit faster for editing larger amounts of text.
Many applications implement specialized content morphs. For example, the Self programming environment defines morphs that represent Self objects, slots, and categories.
The Graphical Environment
Morphic hides many details of the underlying graphics system. This both simplifies programming and provides portability: the layer of abstraction between the programmer and the underlying graphics system allows the implementation of the low-level graphics to be changed without affecting programs written by clients. While the current version of the system is built on the X window system, it could be ported to other window systems fairly easily (although the target window system should support color or grayscale for good results). One might even create a Postscript implementation of the morphic graphics interface to allow morphs to render themselves on paper.
The graphics interface is implemented by canvas objects. There may eventually be many kinds of canvases for rendering onto displays of differing resolutions, color properties, or bit-depths. The current system provides four types of canvas. WindowCanvas and pixmapCanvas draw onto a window or an offscreen buffer via the X protocol. A NullCanvas has the same interface but does not actually draw anything; it can be used to factor out the cost of graphics during performance analysis. ColorRecordingCanvas is used internally by the colormap manager. All canvases implement the following messages for drawing geometric shapes:
draw a single pixel
point: p Color: coutline or fill a rectangle or fill the entire canvas
rectangle: r Color: c
rectangle: r Width: w Color: c
fillRectangle: r Color: c
fillColor: c
draw a solid or dashed line or a connected sequence of line segments
line: pt1 To: pt2 Color: c
line: pt1 To: pt2 Width: w Color: c
dashedLine: pt1 To: pt2 DashSize: d Offset: o Color: c
dashedLine: pt1 To: pt2 Width: w DashSize: d Offset: o Color: c
lines: pointList Color: c
lines: pointList Width: w Color: c
outline or fill a polygon
polygon: pointList Color: c
polygon: pointList Width: w Color: c
fillPolygon: pointList Color: c
outline or fill a circle
circleCenteredAt: pt Diameter: d Color: c
circleCenteredAt: pt Diameter: d Width: w Color: c
fillCircleCenteredAt: pt Diameter: d Color: c
outline or fill a wedge cut by the given angles from an ellipse bounded by the given rectangle
arcWithin: r From: startAngle Spanning: spanAngle Color: c
arcWithin: r From: startAngle Spanning: spanAngle Width: w Color: c
fillArcWithin: r From: startAngle Spanning: spanAngle Color: c
draw a simple or compound curve
bezier: pt1 Control: c1 Control: c2 To: pt2 Width: w Color: c
bSpline: controlPoints Width: w Color: c
catmullRomSpline: controlPoints Width: w Color: c
draw text in the given font and size
text: s At: pt Font: fName Size: fSize Color: cdisplay a portable pixel-based image (a ui2Image)
image: i At: pt
Canvases maintain an offset, allowing graphic operations to be automatically translated. (Canvases also maintain a scale factor, but scaling is not currently used and is probably buggy. Furthermore, image scaling is not implemented.)
In morphic, unlike many graphics packages, the graphics context is hidden from the programmer; all the common parameters that control the behavior of a given drawing command—such as color and line width—are passed as explicit parameters. A few infrequently changed parameters, such as the fill pattern and the clipping rectangle, can be changed temporarily via messages such as withPattern:Do: and withClip:Do:. The canvas handles these messages by changing the state of the underlying graphics context, executing the block provided (which presumably issues some drawing commands to that canvas), and restoring the original state of the graphics context. Nested invocations of withClip:Do: are handled sensibly: a stack of clipping rectangles is maintained and drawing operations are clipped to the intersection of all rectangles currently on the stack.
Specifying Colors
Colors in morphic are represented by paint objects. A paint can be manipulated as either a red-green-blue triplet or as a hue-saturation-brightness triplet. Red, green, blue, saturation, and brightness are specified as numbers in the range [0.0..1.0], where zero means black or unsaturated and one means full-brightness or saturated. Hue, which corresponds to the angular location of the hue on the color-wheel, is specified as a number in the range [0.0..360.0], where zero corresponds to red. Colors with zero saturation (i.e., black, white, and shades of gray) have no hue; if you increase the saturation of such an achromatic color, its hue is arbitrarily chosen to be zero (red).
Paints provide transformations to:
change the red, green, or blue component, change the hue, saturation, or brightness component, and interpolate between two colors.
Since paint objects are immutable, all these transformations are functional. That is, they return a new paint object, leaving the original paint object unchanged.
Paint objects describe colors in a device-independent and persistent manner. They can be saved in snapshots and filed out, and used with any kind of display (or printer, if printing were supported). The details of color map management are handled by each kind of canvas in a way appropriate for the underlying medium. For example, a canvas for a gray-scale display might map colors to shades of gray according to brightness.
Specifying Fonts
When drawing text in morphic, the font’s name and size are specified independently. The size parameter specifies the font height in pixels, and typically ranges from 6 to 72 or more. (The capital letters of a 72 pixel font are about an inch high on a typical display.) This interface suggests that the underlying graphics system fonts can be scaled arbitrarily and, indeed, many modern X servers do support scalable fonts.
The scheme that was implemented for Self 4.0 has not survived the Macintosh port. [1] In order to allow portable specification of fonts, we have introduced a fontSpec prototype that holds a font’s family name (e.g. times), a font style (e.g. bold), and a font size (e.g. 12). This object uses an immutable public protocol; it responds to copy-Name:, copyName:Style:, copyName:Style:Size,etc. Once you have created a fontSpec object you can then pass it to, for example, a label morph:
myLabel fontSpec:
        fontSpec copyName: 'helvetica' Style: 'bold' Size: 14
FontSpec’s encapsulate some attributes of a font and in the future should perhaps encapsulate the color as well.
Footnotes
| [1] | The rest of this section has been written in 1999 under time pressure to get Self 4.1 out so I can get back to other things. John bears no responsibility for its shortcomings. You can send questions about this to me, David Ungar, at david.ungar@sun.com. |