6. How to Program in Self
6.1. Introduction
The Self programming environment provides facilities for writing programs, and the transporter provides a way to save them as source files. Of all the parts of Self, the programming environment probably has the least research ambition in it. We simply needed to concentrate the innovation in other areas: language design, compiler technology, user interface. The Self programming environment strives to meet the high standard set by Smalltalk’s, but with a more concrete feels. The transporter, on the other hand, is somewhere in-between completely innovative research and dull development. It attempts to pull off a novel feat—programming live objects instead of text—and partially succeeds. Its novelty lies in its view of programs as collections of slots, not objects or classes, and its extraction of the programmer’s intentions from a web of live objects.
On the Macintosh, Self uses option-click for a middle-mouse click, and uses command- (the apple
key) click for the right button click. So wherever the text says “left-button-click” just click with the
mouse, where it says “middle-button click” hold down the option key and click with the mouse,
and where it says “right button click” hold down the command key and click with the mouse.
These mappings are defined in Self, so you can change them by editing the whichButton: method in the initialization
category in traits ui2MacEvent.
6.2. Browsing Concepts
6.2.1. Introducing the Outliner
Objects in the Self environment are represented as outliners, which can expand to show increasing
levels of detail. One of these objects has been designed to provide a convenient context
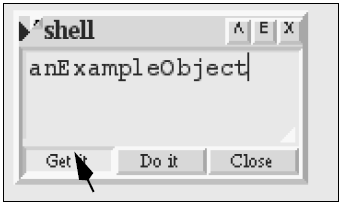
for typed-in commands, and so it is called the shell. If the shell is not already present on your
screen, you can summon it by pressing the middle mouse button on the background and selecting
shell.

Outliners sport three small buttons in the top-right-hand corner labeled “/\”, “E”, and “X”. These buttons summon the object’s parents, add an evaluator text region to the bottom of the outliner, and dismiss the outliner. Press the “E” button to get an evaluator.
Type anExampleObject into the evaluator (it will already be selected) and hit the Get it button
(or type metareturn on UNIX, or command-return on MacOS X):
The result object appears in your “hand” raised above the screen as if you were dragging it with the left button.
Note
If this returns an error, it may be that you don’t have anExampleObject in your Self world. You can always load it from the file objects/misc/programmingExamples.self as follows:
'path/to/objects/misc/programmingExamples.self' runScript
Click the button to set it down.

As with most other things on the Self screen, the left button picks it up and moves it. (For buttons and other things that use left-button for other purposes, you can grab them with marquee selection (really the carpet morph in Self) or with the “Grab” item on the right-button menu.)
6.2.1.1. Expand and Collapse
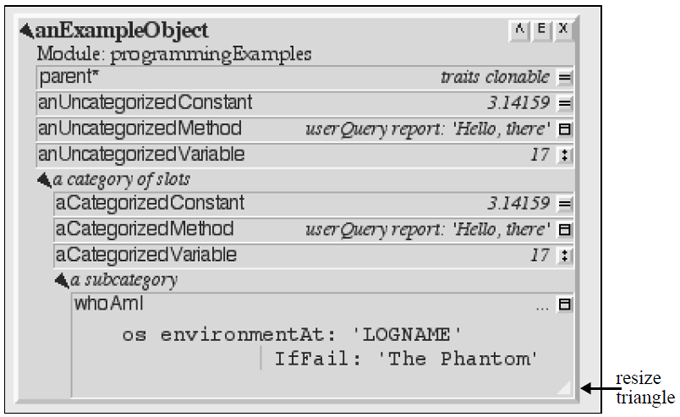
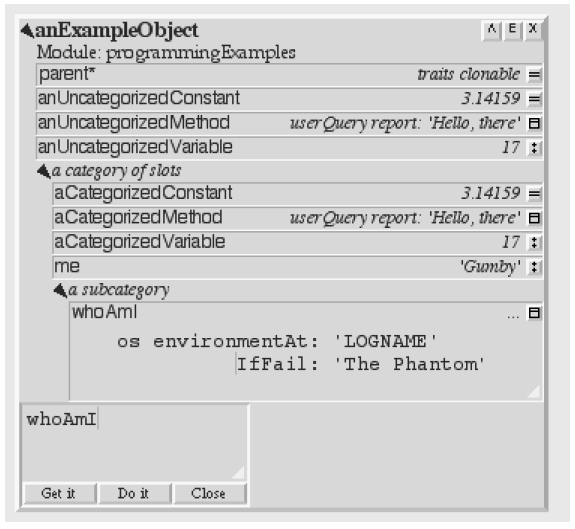
Left-click on the triangle 1 to expand the object and see more information:
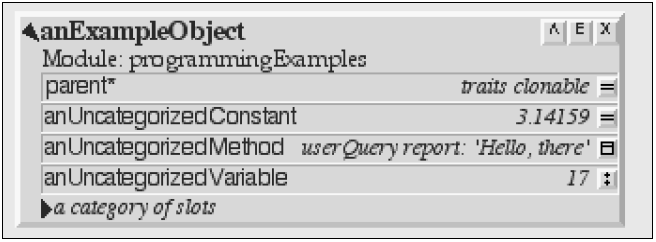
Now it shows a summary of modules containing the slots in this object (just programmingExamples
here), four slots, and a category containing more slots, although those slots are not shown
yet.
6.2.1.2. Categories
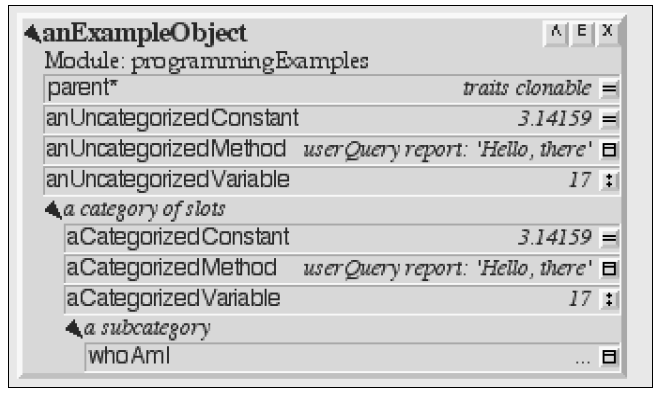
Clicking the top triangle now would collapse this object outliner, but instead look inside the category by clicking its triangle:

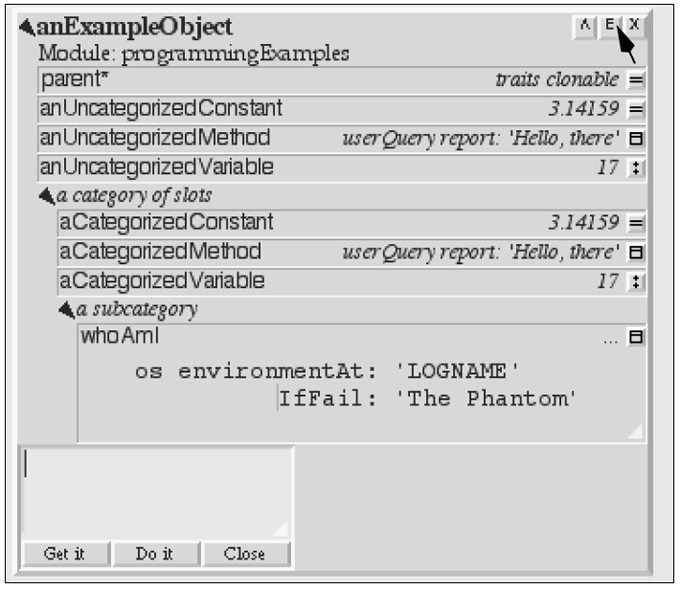
And, one more click expands the subcategory:
6.2.1.3. Slots
The little icons on the right edges of the slots reveal the type of slot:  for a method slot (a slot
containing a method),
for a method slot (a slot
containing a method),  for a constant slot (a slot containing a data object), and
  for an assignable
slot (a pair of slots containing a data object and the assignment primitive). In order to save
space, the data slot and its corresponding assignment slot are lumped together. (In other words in
addition to the visible slot named
for an assignable
slot (a pair of slots containing a data object and the assignment primitive). In order to save
space, the data slot and its corresponding assignment slot are lumped together. (In other words in
addition to the visible slot named aCategorizedVariable containing 17, there is another, invisible
slot named aCategorizedVariable: containing the assignment primitive.)
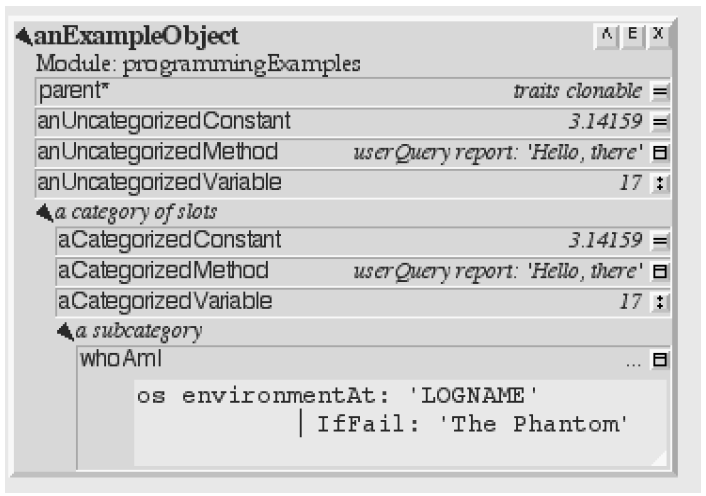
To look at the object contained in a data (constant or assignable) slot, just click on its icon. But if
the slot is a method, clicking its icon opens up a text editor on its source. For example, clicking on
the icon at the right of the whoAmI box opens a text editor displaying its source (and typing control-L
widens the object to show all the text in the selected window):
6.2.1.4. Text Editors
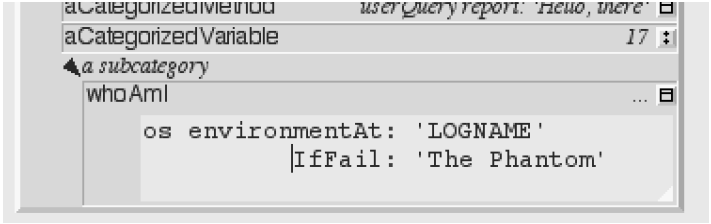
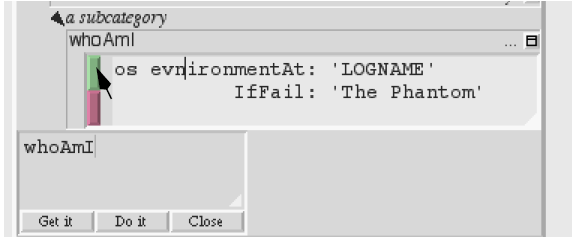
The background of the editor is lighter than the outliner as a whole, and this difference indicates that this editor is the current typing focus: no matter where the mouse is you can type into this editor. A left-click on another editor will select that one as the typing focus, and to indicate that it is no longer the focus, this editor’s background will change to match the outliner:
The white triangle in the lower-right corner of the editor (which can barely be seen in the printout of this document) can be dragged to resize the editor.
Someone has done a poor job of indenting this method, so fix it by clicking to the left of the capital– I and deleting two spaces:
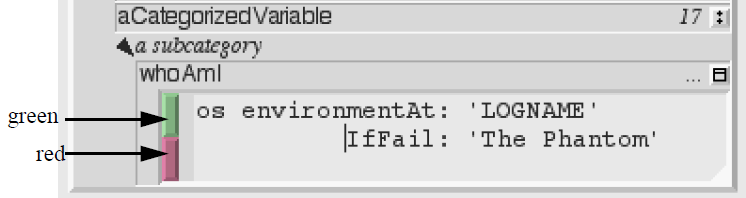
The red and green buttons that just appeared indicate the text has been changed; it no longer reflects the source code of the real method. Hitting the red button will cancel the changes, while hitting the green button will accept them and change the method:
Self text editors will honor the cursor arrow keys, the copy, paste, and cut Sun keys, and many emacs-style control characters:
| Character | Effect |
|---|---|
| control-a | Move to start of line. |
| control-b | Back one character. |
| control-d | Delete next character. |
| control-e | Go to end of line. |
| control-f | Forward one character. |
| control-k | Kill to end of line. |
| control-l | Expand the text editor to show the whole text. |
| control-n | Go to next line. |
| control-o | Open a new line after the cursor. |
| control-p | Go to previous line. |
| control-t | Transpose characters. |
| control-w | Erase previous word. |
| control-y | Yank text from past-buffer to editor. |
| delete, backspace, or control-h | Erase last character. |
| meta-return (command-return on Mac) | Accept. |
| escape (also command-period on Mac) | Cancel. |
| meta-s (command-s on Mac) | Save a snapshot. |
| meta-x (command-x on Mac) | Cut. |
| meta-c (command-c on Mac) | Copy. |
| meta-v (command-v on Mac) | Paste. |
| meta-d (command-d on Mac) | Dismiss morph containing typing focus. |
6.2.1.5. Dismissing Objects
There are four separate ways of dismissing an outliner (or for that matter, anything) from the Self desktop:
- Object outliners: Push the “X” button at the top-right-hand corner.
- Drag it to the trash: left-drag on the outliner till the mouse is over the trash can,
 then release the mouse-button.
 - Dismiss it via the right-button menu: hold down the right button over the outliner, move to the Dismiss button, then release.
- The Carpet Morph: start above (or below) and to the left (or to the right) of the outliner, over the background. Hold down the left button and sweep out an area that completely contains the outliner, then release the left button. The outliner should now be surrounded by a rectangle. Use the middle mouse button inside the rectangle to select Dismiss.
The last two methods, dismissing from the right-button menu, and marquee selection with the carpet morph, come in especially handy with things like buttons and menus because such morphs cannot be grabbed with the left-button.
6.2.2. Menus in the Outliner
Many other operations are available on the outliner by using the middle-button menu on the part of the outliner to be affected. For example anExampleObject has many regions and here are some of them:
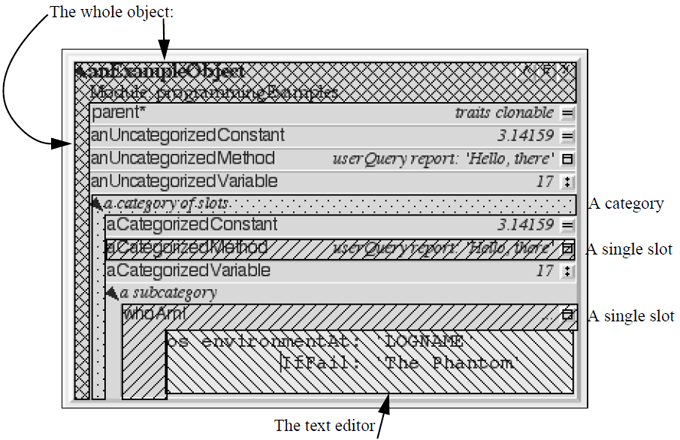
Click on the desired part of the object, be it object, category, slot, text editor, or annotation (annotations will be explained later).
6.2.2.1. The Evaluator
Try out the whoAmI method. Push the “E” button in the top-right of the outliner:
The receiver of any messages sent from an evaluator, or indeed any text editor (via Do It and Get It
in the editor’s middle-button menu) in an object outliner is the object itself. 2 Type whoAmI into
the evaluator and hit the Get it button (or select the Get It from the text editor menu), to send
the message and get back the result:
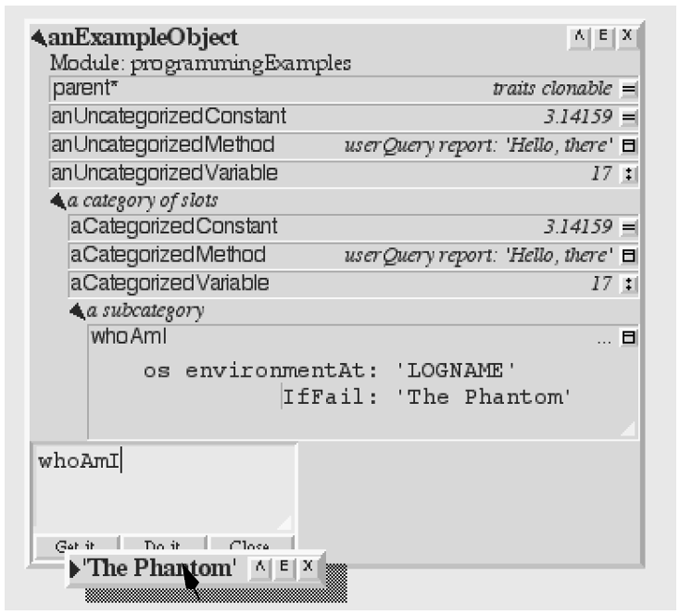
Move the result 3 out of the way and left-click to set it down.
6.2.2.2. Adding a slot
Try one more change: adding a slot to the category “a category of slots.” Hold the cursor
over the words a category of slots and select Add Slot from the middle-button menu.
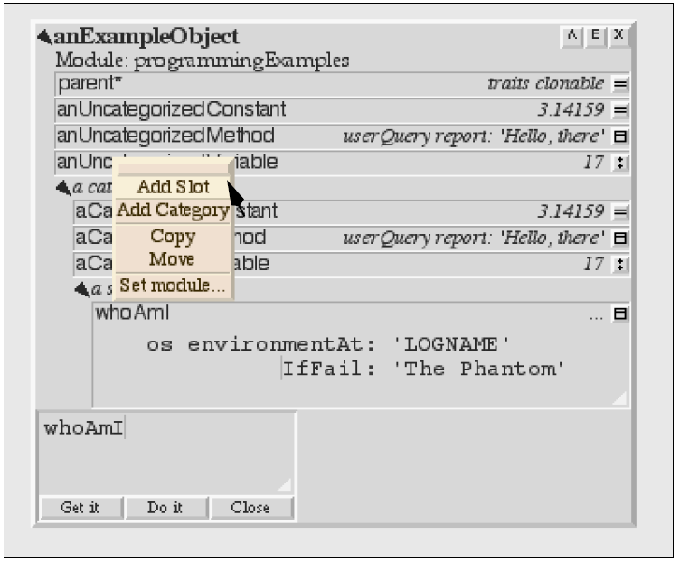
After selecting Add Slot a space for a new slot will appear in the object:
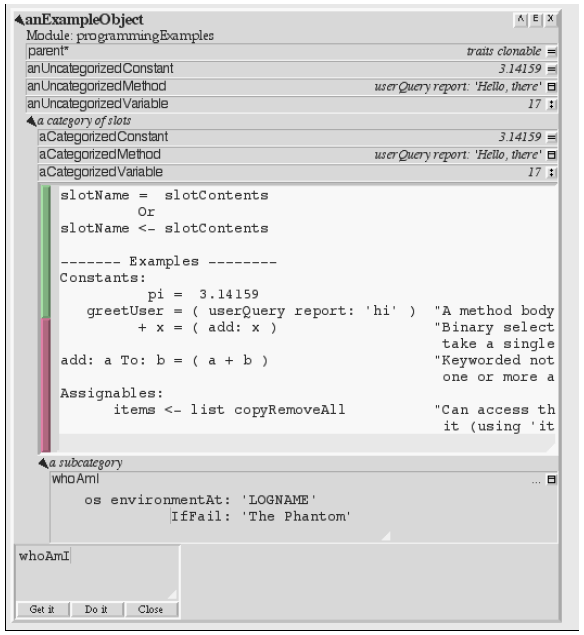
Each line shows the syntax for a different kind of slot. Create a simple variable by typing
me<-’Gumby’ 4 and hitting the green button to accept the change:

After releasing the green button, it stays down to let you know that it is still working. After a few seconds the slot appears: 5
6.2.3. Debugger
Explore the Self debugger. Start by scrambling the send to environmentVariable:IfFail: as
if you had misspelled it.
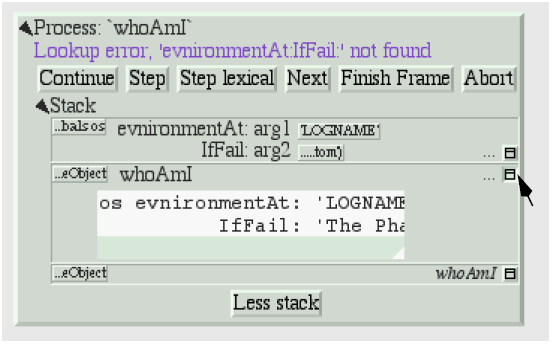
Press the green button to accept the change, then hit the Get it button. This should break something! In fact, instead of the result of the message, a Self debugger will materialize:
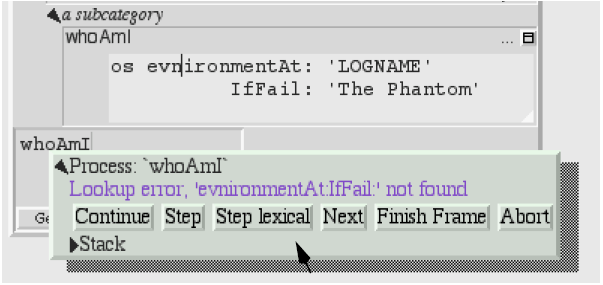
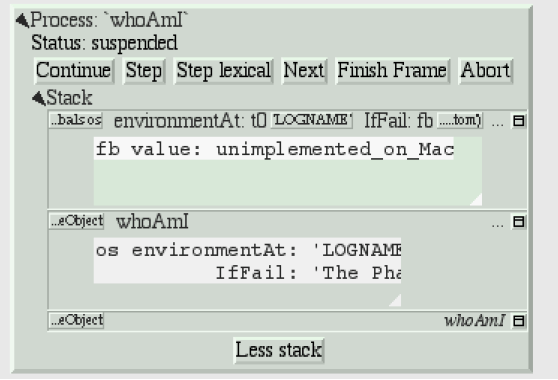
The debugger has a label to indicate which process ran aground, a status indication shown in blue, some buttons for controlling the process, and a collapsed outliner for the stack. Expand the stack:
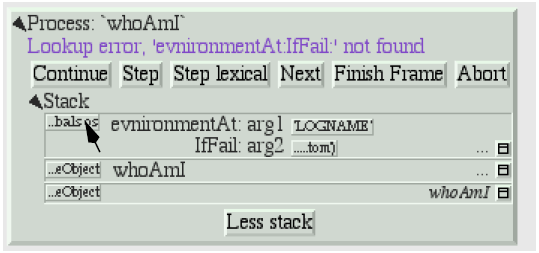
Fig. 6.1 Expanded stack.
The stack filters out uninteresting frames by default 6. The debugger assumes that the first method
you want to see is the one based on the text in the evaluator, and since the stack grows upwards this
oldest frame appears at the bottom. It has no method name, and contains the code whoAmI. That
method called whoAmI, whose code is too long to show next to the slot button, and that method
called evnironmentAt:IfFail: because we just sabotaged it! Of course there is no such method,
but Self creates one dynamically to handle the error.
The little boxes represent the receiver and arguments of the methods on the stack. Get the receiver
of the evnironment... message. Click on the box to the left of the word evnironmentVariable:
(the one labelled “...bals os” if you are running on the Macintosh):

Fig. 6.3 Outliner with interface to the Macintosh.
This object represents the interface to the Macintosh operating system. The little button with the apostrophe in the top-left-hand corner indicates that this object has a comment. Push the button to show (or hide) the comment:
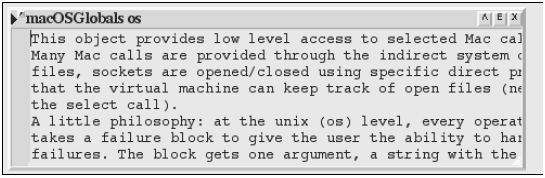
(To automatically resize the outliner to show all the text, press control-L.) To see one of Self’s scroll bars, grab the comment’s resize triangle (with the left-button) and move it up a bit:
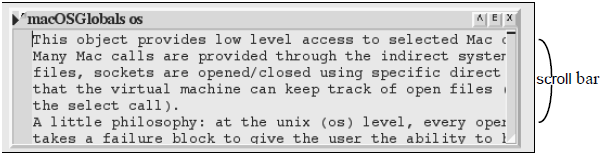
The affordance that appears on the right of the text is the scroll bar, and you can either drag on the little black line or just click in the bar to scroll the text up or down.
Push the little apostrophe button again to hide the comment. Now, you could expand this object to
find the correct spelling of the “evnironment...” message. But instead, pretend that all you remember
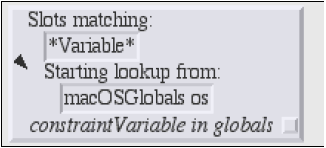
is that it has the word “Variable” in it somewhere. So, use a facility called Find Slot that takes
a pattern and an object, and finds any matching slots in that object or its parents. Use the middlebutton
on the outliner’s title (macOSGlobals os) to get the object menu and select Find slot:
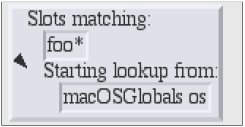
Double-click on the word “foo*” to select that field for editing. (The same trick works on slot names)
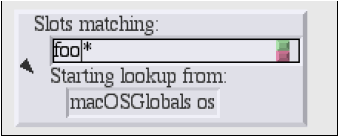
Since we are searching for a method with “Variable” in its name, backspace (the delete key on the Mac) three times 7 to erase the “foo” type in “*Variable*“, hit the green button, and then hit the triangle to start the search (if you make a typing mistake, you can double click the text to make it editable again). The triangle will blink a bit while it is searching (one could do other things in the meantime during a long search), then the enumerator will show the match(es):
Clicking on the little square button(s) would show the exact method(s). But, for our purposes, just
knowing the name is enough and now you have to fix it. So back to the debugger and click on the
method button on the right in the whoAmI slot to expand the stack frame for the whoAmI method:
Now the debugger shows the source of the method, with the actual message being sent highlighted. (In this case it is just the whole thing.) One of the conveniences in the Self programming environment is that you do not have to go back to the original method to fix it, but can just fix it here (following the grand tradition of Lisp and Smalltalk programming environments). So use the left button to select the “vn” and type “nv” instead, then hit the green button to accept the change. The green button will stay in a bit longer because when a method is changed from the debugger, every slot pointing to that same method is made to feel the change—the method is changed in place (see the figure below). This feature lets you change a method in a clone and simultaneously affect the
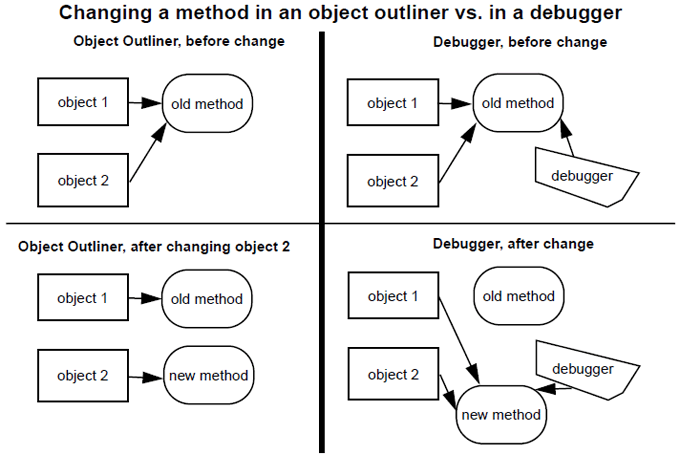
prototype, if you are putting your methods in prototypes instead of traits. Changing a method in an ordinary outliner would just affect that one object, even if other objects had been cloned from it. This rule avoids unintentional changes. The more global kind of change performed by the debugger takes a little longer. When it is accomplished, the red and green buttons will disappear:
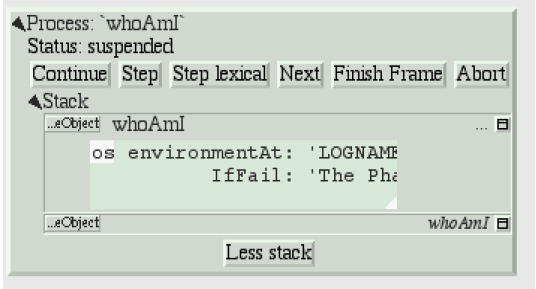
Now os is highlighted to show that the process is about to send “os” to implicit-self. Try the Step
button, which performs a single message send. After hitting the Step button twice (and a control-
L to widen the debugger), the process will have entered the environmentVariable:IfFail: method:
This method is not too interesting (especially on the Macintosh), so leave the debugger by hitting
Continue and letting the process finish.
Congratulations on making through the interactive tutorial. In the remainder of this manual, we will dive deeper into the programming environment for readers who want to write real programs in Self.
Here is more information on the debugger for future reference:
| What it says | What it does |
|---|---|
| Continue | Resumes running the process |
| Step | Perform one message send (skipping over trivial accesses and assignments); Steps into the called method. |
| Step Lexical | Execute messages until control returns to the same lexical method, or until this method exits. Very useful for methods with blocks. |
| Next | Performs a message send and any messages in the called method; Steps over the called method. |
| Finish Frame | Finishes running the topmost method. |
| Abort | Kills off the process and dismisses the debugger. |
In addition to the buttons, each frame in the debugger has some items to control the process in its middle-button menu:
| What it says | What it does |
|---|---|
| Step | Top frame: same as step button, not top frame: Finish any called methods. |
| Next | Same as next button. |
| Retry | Cut back the stack to this frame, then continue the process. |
| Revert | Cut back the stack to this frame. |
| Finish | Finish this frame. |
6.2.4. Enumerators
In addition to the Find Slot enumerator, Self has other ways to find things:
| Name | Function |
|---|---|
| Implementors | Finds all the slots with a given name. |
| Implementors of : | Finds all the slots with the given name that take an argument (for read/write slots only). |
| Senders | Finds all the methods that send a message with a given name. |
| Senders of : | Finds all the methods that send the corresponding assignment message (read/write slots only). |
| Senders in family (Senders of : in family) | Finds all the methods in this object, its ancestors, and descendants that send a message with a given name (or the corresponding assignment message). |
| Find Slot | Starting from a designated object, finds all slots in that object and its ancestors whose name matches a given pattern. Case is ignored, “?” matches any character, “*” matches any series of zero or more characters. Also comes in “of :” and “in family” flavors. |
| Methods Containing | Finds methods containing the specified string. Similar to grep without wildcards. |
| Copied-down Children | Finds objects copied-down (see below) from this one. |
| References | Finds slots that contain references to the selected object. |
| Slots in Module | On the module menu (see below); shows all slots in a given module. |
| Added or Changed Slots in Module | On the module menu (see below); shows all slots added or changed in the module since it was filed out. |
| Removed Slots in Module | On the module menu (see below); shows the names of the slots removed from the module since it was last filed out. |
| Expatriate Slots | On the changed module menu (see below); shows all slots in filed-out objects that do not themselves specify a module. These slots will not be filed out. |
The copy-down and module enumerators will be covered later.
The other enumerators can be summoned from several places: the outliner menu, the slot menu,
and the text editor menu. As a shortcut, selecting a whole expression in the text editor and then asking
for an enumerator will bring up the enumerator to search for the outermost message send in the
expression. So if you select the following expression: aSet findFirst: elem IfPresent:
[snort] IfAbsent: [sludge] and choose implementors from the text editor menu, you will
get an Implementors enumerator ready to search for findFirst:IfPresent:IfAbsent:. Of
course, you can always change the search target by double-clicking and editing the text. The text
editors also implement a host of handy double-clicking shortcuts.
Finally there is one last detail about enumerations: many contain a check-box to choose Wellknown only. This is always checked by default to speed things up. When checked, only wellknown (i.e. filed-out, see below) objects are searched, which is much faster.
6.3. Hacking Objects
Hacking—the discipline of making fine furniture from trees using an axe.
In going through this document, you have already added a slot and edited methods in both object outliners and debuggers. In addition Self has many other ways to change an object:
| Ways to change an object | How | Why |
|---|---|---|
| Removing, Moving, Copying Categories | ||
| Removing a category. | “Move” in category middle menu, then drag the category to the background or the trash can. | Removing a category. |
| Add slot or category to object or category. | “Add Category” in object or category middle menu, then type in the new category name, then hit green button to accept. | Adding a new category. |
| Moving a category. | “Move” in category middle menu, then drag to another object. | Copying a category. |
| Copying a category. | “Copy” in category or category middle menu, then drag the category to another object. | Copying a category. |
| Removing, Adding, Moving, Copying Slots | ||
| Removing a slot. | “Move” in slot middle menu, then drag the slot to the background or the trash can. | Removing a slot. |
| Add slot to object or category. | “Add Slot” in object or category middle menu, then type in the new slot name, “=” or “<-”, and contents of slot (or just name alone for variable slot containing nil), then hit green button to accept. | Adding adding a new. |
| Moving a slot. | “Move” in slot middle menu, then drag to another object. | Moving a slot. |
| Copying a slot. | “Copy” in slot or category middle menu, then drag the slot to another object. | Copying a slot. |
| Adding a Comment | ||
| Add a comment to an object or slot. | “Show Comment” in the object or slot middle menu to open up a comment text editor, then typing in the comment, then hit the green button to accept it. If an object or slot already has a comment, it can be shown/hidden by hitting the small button labeled with a single quote. | To amuse and intrigue those who follow. |
| Changing a slot | ||
| Edit a slot. | “Edit” on a slot middle-button menu, then make any changes in the text editor, then hit green button to accept changes. | To change the contents of a constant data slot, or to change contents and set initial value at same time, or to change a slot from data to method or from constant to variable. |
| Edit slot name or its argument names. | Double-click on the name of the slot, wait for red and green buttons to appear on the right of the name, edit the name, then hit the green button. | To change a slot’s name or the names of its arguments. |
| Change a method in a slot. | Click on the method icon button on the right of the slot to open a text editor on the method. Make the changes, then click on the green button to accept them. | To fix a bug in a method. |
| Change the visibility of a slot. | On the slot’s middle menu choose “Make Public,” “Make Private,” or “Make Undeclared.” | The Self interface uses bold, normal, and sans-serif fonts to indicate public, private, and unspecified slots.This distinction carries no semantics, but serves to record the programmer’s intentions. |
| Annotating an Object | ||
| Change creator annotation of an object. | “Show Annotation” in object middle menu to expose object annotation information, then click on creator path field and typing in desired creator path, then hit green button to accept annotation. | Setting creator path tells transporter which slot “owns” this object, and tells environment what to name the object. |
| Set creator of contents of a slot to that slot. | “Set Creator” in slot middle menu. | See above. |
| Change copy-down information. | “Show Annotation” in object middle menu to expose object annotation information, then click on copy-down-parent field and type in desired copy-down-path, copy-down selector and slots to omit) then hit green button to accept annotation. | Simulates subclassing by allowing an object to contain copies of the slots in another object. When copy-down-parent has slots added/ changed/removed, the change propagates to the copied-down children. |
| Change the object’s “isComplete” flag. | “Show Annotation” in object middle menu to expose object annotation information, then push one of the isComplete radio buttons, then hit green button to accept the annotation change. | After building a new prototype, set isComplete to get the environment to show its printString, and to get the transporter to use its storeString. |
| Annotate a slot | ||
| Set the module membership of a slot, the slots in a category, or the slots in an object. | Select “Set Module” from the middle menu of a slot, category, or object, then (for object or category) indicate which slots you want to change by choosing which module they currently belong to, finally select a new module to put the slots in. | To ensure that slots are filled out in the correct source file. |
| Type in or examine the module for a single slot. | “Show Annotation” on the slot middle menu to expose the annotation, then click on the module editor, type in the module name, then click the green accept button. | Save as above. |
| Change slot initial contents. | “Show Annotation” on the slot middle menu to expose the annotation, then click on the “Follow Slot” button, or type the desired initial value expression into the ”Initial Contents” editor, then hit the green accept button. | To have the transporter record the current contents of a slot, choose “Follow Slot.” To have it ignore the current value and just record a given expression for the slot’s initial value use the “Initial Contents” option. |
6.4. The Transporter
The transporter has been built in order to move programs from one world of objects to another. You can ignore it as long as you work with just one snapshot. However, if you want to give your program to someone else, or save it as source, or read it in to a newer snapshot, you will need to learn about the transporter.
6.4.1. The Traditional Schism between Program and Data
What is a program? In most systems it is a piece of text, although in more advanced environments it may have structure. It is a description that can be used to create an activity, a running program, that can then operate on data. In the conventional view:
| Program | Data | |
|---|---|---|
| Who can change it | The programmer | The user |
| When can it change | At programming time | At execution time |
| How is it changed | With a text editor | By running a program |
This model grew up in an era where computers were too small to host both compilers and applications at the same time. Although it has some virtues it makes other operations very hard: it is hard to include data, such as hand-drawn icons, directly into a program, and it is hard to write applications whose data domain is really programs.
6.4.2. Data = Program
For Self, we have gone a different way, following in the footsteps of Smalltalk and Lisp:
A Self program consists of live objects.
Self has no edit/run mode. To change an object, you do not retreat to a source file, or even to a class, you just change the object itself. This immediacy and concreteness lessens the cognitive burden on the programmer, smooths the learning curve, and hastens gratification.
However, this stance creates a big problem the moment you need to move a program from one world of objects to another; it is very hard to pin down what to do. For example, suppose an object contains a slot with 1024 in it. Should that value be copied literally? Perhaps it is the result of some computation (such as the width of the current screen) and should be recomputed instead. There simply is not enough information in a Self object to extract programs from Snapshots.
6.4.3. Changes vs. Pieces
Earlier in the project we considered constructing a calculus of changes that could be used to represent programs, and then moving programs by reapplying the changes to the new snapshot. But, we had enough on our plate and rejected this approach as too ambitious to tackle without a dedicated graduate student.
Instead, we decided to represent programs as pieces that could be filed out of a snapshot and filed in to another. To allow us to merge changes to the same program, we decided to represent its pieces as Unix source files amenable to RCS. The Self Transporter was built to save programs as source files.
6.4.4. Objects vs. Slots
But what is a program? Although a new program frequently involves creating new objects, it also
can mean added slots to existing objects. For example, a program to find palindromes might add a
slot to traits string called isPalindrome. So we decided to refine the granularity of the
Transporter to the slot level; each slot has an annotation 8 (its module) which gives the name of the
source file containing that slot. This hair- or rather object-splitting implies that one object may be
built incrementally as the result of reading several files, and so the transporter endeavors to keep
the order that the files are read in as independent as possible. Since each object can possess slots
in different modules, the outliner shows a summary of the modules of an object, sorted by frequency.
Turned around, a module can be viewed as a collection of slots, plus some other information: each
module also includes a directory, a list of submodules to be read in whenever it is read, and
postFileIn method to be run whenever the module is read. These data allow modules to be organized
hierarchically by subsystem, for example the allUI2 module includes all the modules in the ui2
system.
Now here comes the nice part: the Self environment incrementally maintains a mapping from modules to slots, and a list of changed modules, which can be obtained from the background menu. When you make a change the appropriate module will be added to the list, and can be written as a source file by clicking its ‘W‘ button. The middle-button menu on the changed modules and individual modules contains a host of useful entries for understanding what has been changed.
6.4.5. What to Save for the Contents of a Slot
At this point, the reader may be thinking “So modules know which slots they include, but how do they know which objects to include?” After all, when the transporter saves a slot in a file what can it put for the contents of the slot? Here is where the transporter runs smack into the problem of not enough information, and a variety of means have to be used. As shown in the flowchart below:
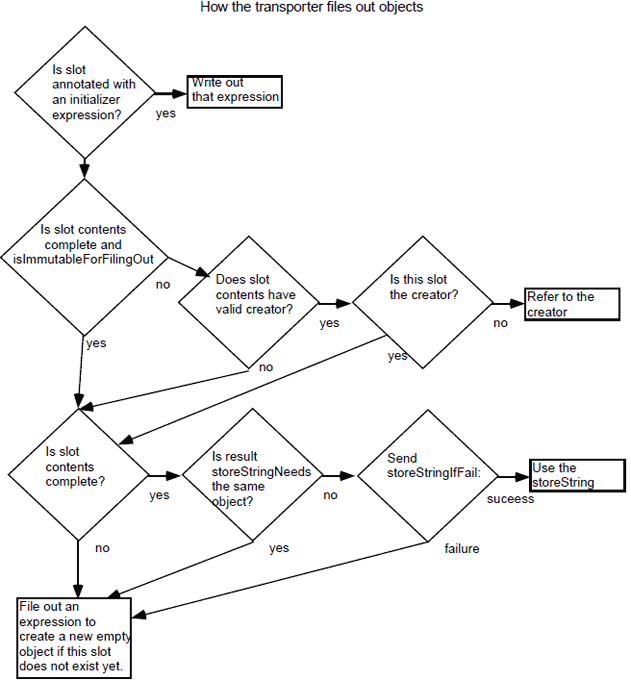
- Sometimes the programmer does not want to store the actual contents of a slot, but instead wants to store an initialization expression. This intention is captured with another annotation on a slot: each slot can either be annotated Follow Slot or Initialize To Expression In the latter case, an initializer is also supplied.
- Even though the transporter is supposed to follow the slot, it may contain an object that is created
by another slot. For example, the
parentslot in a point should just refer totraits pointrather than recreating the traits object. This information is captured by aCreatorannotation on each object that gives the path from thelobbyto the slot intended to create the object. In this case, the transporter just files out a reference to the object’s creator, cleverly enough so that the actual creator slot does not need to have been already filed in. On the other hand, if an object is immutable, its identity is not important. If an object is annotated asisComplete9 the transporter sends itisImmutableForFilingOutand if that message returnstrue, the transporter never files out a reference. For example, integers would answertrueto this message. - If the contents of the slot is a simple (usually immutable) object like
17,3@4, or ‘foo’ (the string) the transporter should just ask the object for a string to store. It does this by checking to see if the object is annotated asisCompleteto see if it is safe to send the object messages, checks to see if this object is itself needed for the string (it would be a mistake to file out the prototypical point as0@0, because thexslot would never be defined), then asks the object for a store string.To see if the object must itself be filed out, it sendsstoreStringNeedsand if this message does not return the object itself it sendsstoreStringIfFail:. If this succeeds, the transporter can save a data-type specific string for the object. This fairly elaborate mechanism allows programmers to add new kinds of objects that transport out with type-specific creation strings. - Finally, if it can do nothing else, the transporter creates a new object for the contents of the slot. The object is created in a clever way so that a file that adds slots to an object can be read before the file that officially creates the object without loss of information.
Filing out objects is too complicated, and over the past two years we have repeatedly tried simpler schemes. However, all of the capabilities in the current scheme seem to be essential in some case. This issue remains as a question for future work.
6.4.6. Copy Down
Because Self eschews classes and because the current compiler cannot optimize dynamic inheritance,
it is necessary to copy-down slots when refining an object. For example, the prototypical
morph object contains many slots that every morph should have, and some mechanism is needed
to ensure that their presence is propagated down to more specialized morphs like the circleMorph.
In a class-based language, this need is met by a rule ensuring that subclasses include any instance
variables defined in their superclasses. In Self, this inheritance of structure is separated from the
inheritance of information performed by the normal hierarchy of parent slots. Instead of including
a facility for inheriting structure in the language, Self implements a facility in the environment,
called “copy-down.” An object’s annotation can contain a copy-down parent, copy-down selector,
and set of slots to omit. The copy-down parent is sent the message given by the copy-down selector,
and (except for the slots-to-omit), the slots in the result are added to the object. Copied-down
slots are shown in pink in the outliner. For example, here are the prototypical morph and the prototypical
circleMorph:
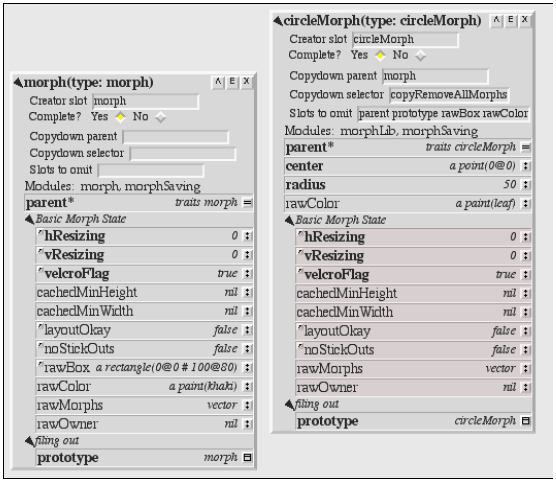
The Basic Morph State category of slots has been copied from those in morph by first copying
the morph and removing all its submorphs (i.e. by sending it copyRemoveAllMorphs) and then
copying the resultant slots, omitting parent, prototype, rawBox and rawColor. The first
three of these slots were omitted because their contents had to be different; copied-down slots are
copied, they cannot be specially initialized in Self. The omitted slot rawBox is more interesting;
circle morphs do not need this slot at all and so omit it. Most other object-oriented programming
systems would not allow a subclass to avoid inheriting an instance variable.
The Self programming environment uses the copy-down information to allow the programmer
to use a class-based style when appropriate. For example, if the programmer adds a slot to morph
the environment will offer to add it to circleMorph, too. If the programmer should use a text editor
to edit the definition of morph, the circleMorph object will be changed after rereading both object’s
text files. The least convenient aspect of using copy-downs is that to do the moral equivalent
of creating a subclass, the programmer has to create two objects: a new traits object, and a new prototype,
and then set the object annotation of the new prototype. Perhaps someday there will be a
button to do this, or perhaps other styles of programming will emerge.
6.4.7. Trees
By default, the tranporter writes out Self modules out to a tree rooted in the current working directory, or the ‘objects’ subdirectory of the directory given to the VM in the shell environment variable SELFWORKING_DIR.
Howevever Self modules have a slot ‘tree’ which can take a name of a tree. If the name of the tree is not an empty string, then the module writer will look up a directory in the dictionary found at modules init treeDictionary.
This allows the developer to maintain several separate trees. For example:
modules init
  registerTree: 'org_selflanguage_webserver'
            At: 'path/to/parent-folder'.

bootstrap read: 'webserver'
        InTree: 'org_selflanguage_webserver'.
Important considerations: module names are globally unique (that is, two modules called ‘webserver’ in different trees are considered the same module and will overwrite each other). The tree name itself should also be globally unique - that is it is not possible to have two trees with the same name in a single Self world.
The advantages of this over a simple symbolic link to a separate filesystem tree is we can do overlays - if you want special string behaviour, then put it in your tree in my_tree/core/string.self and it will override as expected.
Modules that import subparts will import them from the same tree by default.
6.4.8. Versioning
Each transporter module has a slot named revision containing a string version number. It is recommended that you use Semantic Versioning 10 so that the version of a module can be tested as follows:
modules string version >= (modules init moduleVersion copyOn: '1.0.0')
  ifFalse: [log warning: 'Old string version']
This test could be placed in the preFileIn slot of your module to ensure a sane file in environment before the rest of the file is read.
This concludes a brief tour of the Self programming environment. Although we strove for simplicity in the design of Self, its programming environment includes a fair amount of functionality which may take a while to learn. We hope that you find the investment worth the reward.
Footnotes
| [1] | Double-clicking on the triangle will expand (or contract) all levels instead of just a single level. |
| [2] | However, in a stack frame in the debugger (described below), the receiver of a message is the same as the receiver for the stack frame. |
| [3] | I am revising this for Self 4.1 on my trusty Mac, and Self does not implement environment variables here. |
| [4] | Since all that stuff in the text editor was initially selected, your typing conveniently replaced it all. |
| [5] | If you examine the slot’s annotation (available via the slot menu) it will show that the system has guessed that the new slot (named “me”) should be saved in the “programmingExamples” module, and that instead of saving its actual contents, the slot should just be initialized to the string ‘Gumby’. |
| [6] | Since the Self compiler inlines calls automatically, Self code tends to be written in a highly-factored, deeply-nested style. Thus, the debugger filters out stack frames that seem to be unimportant. If it ever filters out the frame you need to see, there is a “Don’t filter frames” entry in the stack’s middle-button menu. |
| [7] | One rough edge remaining in the Self user interface is the existence of two test editors, and this one does not implement multi-character selection, sigh. Or, you could type control-A to go the start, and control-K to delete the whole field, sigh. |
| [8] | The Self Virtual Machine provides for annotations on slots or whole objects. While the annotations do not influence program execution, they can be accessed and modified by Self’s reflective facility, mirrors. Annotations are used to hold many things, including comments on objects and slots. |
| [9] | isComplete is used by the environment to decide when it is safe to send messages like printString. |
| [10] | See http://semver.org for a specification. In essence, versions are of the form “3.2.1-alpha6”. |